Introduction
Security Assertion Markup Language (SAML) is a standard for exchanging authentication and authorization data between parties. It enables Single Sign-On (SSO), simplifying access to multiple services with a single set of credentials. For developers new to SAML, it can seem complex, but understanding its components and workflows can demystify the process and empower you to implement secure authentication systems.
This post will provide an overview of SAML, followed by a technical deep dive into its key components and how they interact.
What is SAML?
SAML is an XML-based framework for exchanging user authentication and authorization data between two main entities:
• Service Provider (SP): The application or service a user wants to access.
• Identity Provider (IdP): The entity responsible for authenticating the user and providing identity information to the SP.
The goal of SAML is to allow the SP to rely on the IdP to authenticate users, removing the need for the SP to handle authentication directly.
Key Concepts in SAML
1. SingleSignOnService (SSO)
The SingleSignOnService is a core feature of SAML. It allows users to authenticate once with the IdP and gain access to multiple SPs without re-entering credentials. This is achieved using SAML assertions, which are secure XML documents containing authentication and authorization data.
Workflow:
1. A user attempts to access a protected resource at the SP.
2. The SP generates a SAML Authentication Request and redirects the user to the IdP.
3. The IdP authenticates the user (e.g., via username/password or multi-factor authentication).
4. The IdP generates a SAML Assertion, signs it, and redirects the user back to the SP.
5. The SP validates the assertion and grants the user access.
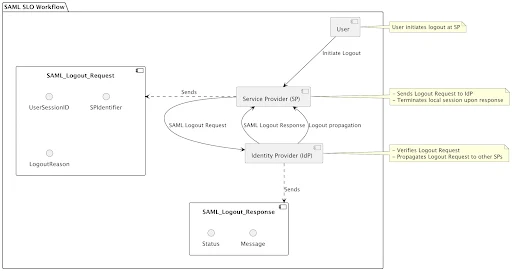
2. SingleLogoutService (SLO)
The SingleLogoutService ensures that when a user logs out from one SP, they are also logged out from all other connected SPs and the IdP.
Workflow:
1. A user initiates logout at an SP.
2. The SP sends a SAML Logout Request to the IdP.
3. The IdP propagates the logout to other SPs where the user has active sessions.
4. The IdP sends a SAML Logout Response to the initiating SP to confirm the logout.
SLO is critical for maintaining session consistency and preventing orphaned sessions across services.
3. Service Provider (SP)
The SP is the consumer of SAML assertions. It relies on the IdP to authenticate users. SPs trust the IdP’s assertions because they are digitally signed, ensuring integrity and authenticity.
Key Responsibilities:
• Generate SAML Authentication Requests.
• Validate SAML Assertions received from the IdP.
• Enforce authorization rules based on attributes in the assertion.
4. Identity Provider (IdP)
The IdP is the authority that authenticates users and issues SAML assertions. It is the cornerstone of trust in a SAML setup.
Key Responsibilities:
• Authenticate users securely.
• Provide identity information and attributes to SPs.
• Manage the trust relationship with SPs, usually established via certificates.
5. SAML Federation
SAML federation refers to the establishment of trust relationships between multiple SPs and IdPs. This allows seamless interoperability in environments where multiple organizations or services share a common user base.
Federation typically involves:
• Exchanging metadata files, which include details about endpoints, certificates, and supported bindings.
• Agreeing on shared identifiers and attributes (e.g., email, user ID).
• Setting up signing and encryption certificates for secure communication.
How Authentication Data is Transferred in SAML
The SAML protocol involves several key steps:
1. Authentication Request (AuthnRequest):
• The SP sends an AuthnRequest to the IdP’s SingleSignOnService endpoint.
• This request includes metadata like the SP’s unique identifier, requested bindings, and a unique ID.
2. User Authentication:
• The IdP authenticates the user via its chosen method (e.g., credentials, biometrics).
• Upon success, the IdP generates a SAML assertion.
3. SAML Assertion:
• The assertion contains:
• Subject: The authenticated user’s identifier (e.g., email or username).
• Conditions: Validity period and audience restrictions.
• Attributes: Optional user attributes (e.g., roles, groups).
• Authentication Statement: Details about the authentication event.
• The assertion is signed using the IdP’s private key for integrity and authenticity.
4. Response:
• The IdP sends the SAML assertion in a SAML Response back to the SP, often via the user’s browser.
• The SP validates the response using the IdP’s public key.
5. Access Grant:
• Upon successful validation, the SP grants the user access to the requested resource.
SAML Bindings: Transporting Data
SAML defines several “bindings” for transporting messages between SPs and IdPs:
• HTTP Redirect Binding: Typically used for AuthnRequests, where the request is encoded in a URL.
• HTTP POST Binding: Used for SAML Responses, where the assertion is embedded in an HTML form.
• SOAP Binding: Often used for back-channel communications like SingleLogoutService.
Each binding ensures secure and reliable transmission of data.
Security Considerations
• Signing and Encryption: All assertions and responses should be signed, and sensitive data can be encrypted to prevent tampering and eavesdropping.
• Replay Attacks: Use unique IDs and timestamps in SAML messages to prevent reuse.
• Certificate Management: Regularly update and rotate signing and encryption certificates to maintain trust.
Practical Implementation Tips
1. Leverage Existing Libraries: Use established SAML libraries (e.g., simplesamlphp, OneLogin for Python, Sustainsys.Saml2 for .NET) to handle complex tasks like request generation and assertion validation.
2. Understand Metadata: Exchange and validate metadata files to establish trust between SPs and IdPs.
3. Test Extensively: Use tools like SAML-tracer or browser developer tools to debug SAML message flows.
4. Monitor Logs: Both SPs and IdPs should log SAML events for troubleshooting and auditing.
Conclusion
SAML is a robust framework for implementing SSO and federated identity management. By understanding its components—SP, IdP, assertions, and services like SSO and SLO—you can build secure and user-friendly authentication systems. While the initial learning curve may be steep, the benefits of implementing SAML make it worth the effort.
If you’re ready to get started, dive into the configuration and setup of your IdP and SP, and let SAML simplify authentication for your users.