Wednesday, March 20, 2024

How to Import UTF-8 CSV Files in Excel 2024 – A Step-by-Step Guide

Introduction

Have you encountered roadblocks when trying to import UTF-8 CSV files into Excel 2024? If you've attempted the double-click routine only to meet with frustration, you're not alone. But take heart—the journey to seamless importation is closer than you think. This streamlined guide is crafted to navigate you through the process effortlessly.

Procedure

Starting Up

Start by opening Microsoft Excel 2024 and selecting a Blank Workbook. This clean slate will serve as the foundation for your data import journey.

Data Tab Navigation

Direct your attention to the "Data" tab situated in the ribbon at the top of Excel. This hub is where the magic begins!

Acquiring Data

Within the "Data" tab, you will find the "Get Data" button. Click on "From Text (Legacy)" to initiate the import of your CSV file. This step is crucial as it sets the stage for proper file handling.


File Selection

Next, navigate to the location where your Unicode CSV file is stored, select it, and then confirm your selection by clicking the "Get Data" button.

Text Import Wizardry

Upon selection, Excel will display a preview of the data. It might auto-select a file origin type, but here's a critical tip: ensure you alter the "File Origin" to "Unicode (UTF-8)" for accurate Unicode character processing.

Setting the Delimiter

Ascertain that the delimiter is correctly set to "comma" or another appropriate character that segregates your CSV values, then proceed to click "Finish".


Finalizing Import

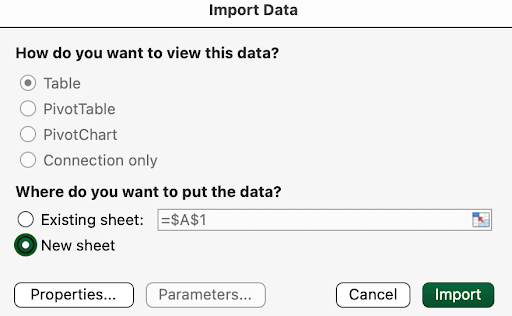
You are presented with a choice to embed the data into an Existing or New Sheet. Choose according to your data organization preferences.


 Conclusion

By following these methodical steps, you can ensure that your UTF-8 CSV files are imported into Excel 2024 without any character encoding issues, maintaining the integrity of your precious data.

This process may seem intricate at first glance, but with practice, it becomes second nature.

Please comment if you found it helpful!

Tuesday, August 22, 2023

Laravel 10 Local Development: A Docker Compose for SSL, Database, Mock API, and Email

Introduction

In the modern development environment, creating a robust and flexible local development setup is crucial for success as a programmer. Laravel, a popular PHP framework, has evolved over the years to adapt to these demands. In this article, we will take a closer look at an advanced Dockerfile configuration that extends Laravel 10's out-of-the-box setup to include SSL, local testing databases, Mock API servers, and a mock email server.

The Complete File


version: '3'
services:
    laravel.test:
        build:
            context: ./vendor/laravel/sail/runtimes/8.2
            dockerfile: Dockerfile
            args:
                WWWGROUP: '${WWWGROUP}'
        image: sail-8.2/app
        container_name: ${COMPOSE_PROJECT_NAME}-application
        extra_hosts:
            - 'host.docker.internal:host-gateway'
        ports:
            - '${VITE_PORT:-5173}:${VITE_PORT:-5173}'
        environment:
            WWWUSER: '${WWWUSER}'
            LARAVEL_SAIL: 1
            XDEBUG_MODE: '${SAIL_XDEBUG_MODE:-off}'
            XDEBUG_CONFIG: '${SAIL_XDEBUG_CONFIG:-client_host=host.docker.internal}'
            IGNITION_LOCAL_SITES_PATH: '${PWD}'
        volumes:
            - '.:/var/www/html'
        depends_on:
            - mariadb
            - smtp
            - mockApiServer

    mariadb:
        image: mariadb:10.6
        container_name: ${COMPOSE_PROJECT_NAME}-mariadb
        ports:
            - '${FORWARD_DB_PORT:-3306}:3306'
        environment:
            MYSQL_ROOT_PASSWORD: '${DB_PASSWORD}'
            MYSQL_ROOT_HOST: '%'
            MYSQL_DATABASE: '${DB_DATABASE}'
            MYSQL_USER: '${DB_USERNAME}'
            MYSQL_PASSWORD: '${DB_PASSWORD}'
            MYSQL_ALLOW_EMPTY_PASSWORD: 'yes'
        volumes:
            - './docker/mariadb/storage/data:/var/lib/mysql'
            - './vendor/laravel/sail/database/mysql/create-testing-database.sh:/docker-entrypoint-initdb.d/10-create-testing-database.sh'
        healthcheck:
            test: [ "CMD", "mysqladmin" ,"ping", "-p${DB_PASSWORD}" ]
            retries: 3
            timeout: 5s

    caddy:
        build:
            context: "./docker/caddy"
            dockerfile: Dockerfile
            args:
                WWWGROUP: "${WWWGROUP}"
        container_name: ${COMPOSE_PROJECT_NAME}-caddy
        restart: unless-stopped
        ports:
            - "${APP_PORT:-80}:80"
            - "${APP_SSL_PORT:-443}:443"
        environment:
            LARAVEL_SAIL: 1
            HOST_DOMAIN: laravel.test
        volumes:
            - "./docker/caddy/Caddyfile:/etc/caddy/Caddyfile"
            - ".:/srv:cache"
            - "./docker/caddy/storage/certificates:/data/caddy/certificates/local"
            - "./docker/caddy/storage/authorities:/data/caddy/pki/authorities/local"
            - "./docker/caddy/storage/data:/data:cache"
            - "./docker/caddy/storage/config:/config:cache"
        depends_on:
            - laravel.test

    smtp:
        image: mailhog/mailhog
        container_name: ${COMPOSE_PROJECT_NAME}-email
        logging:
            driver: none  # disable saving logs
        ports:
            - "1025:1025" # smtp server
            - "8025:8025" # web ui

    mockApiServer:
        # Mock API server to test against third-party services
        # without having to hit the real production server. One does need to
        # add any desired API configurations in the mockserver-initializer.json
        # file.
        container_name: ${COMPOSE_PROJECT_NAME}-mock-api-server
        image: mockserver/mockserver
        ports:
            - "1080:1080"
        environment:
            TZ: "America/New_York"
            MOCKSERVER_PROPERTY_FILE: /config/mockserver.properties
            MOCKSERVER_INITIALIZATION_JSON_PATH: /config/mockserver-initializer.json
        volumes:
            - './docker/mockApiServer:/config'
    

The Servers

System Diagram

caddy

The caddy server is an open-source web server with automatic HTTPS. It is used to provide SSL to the Laravel application and handle reverse proxying.

Configuration

  • WWWGROUP: Similar to the Laravel application server, this variable defines the group used by the web server.
  • Ports: Exposes the standard HTTP and HTTPS ports.
  • Environment: Contains settings related to domain handling.
  • Reverse Proxy: Redirects requests to the Laravel application, adding necessary headers for proper functioning.

laravel.test

This server is responsible for hosting the Laravel application. It handles web requests, communicates with the database and APIs, and sends notifications like email.

Configuration

  • WWWGROUP: This variable defines the group ID for the web server process. If unset, the default group ID from the host system is used.
  • WWWUSER: This variable defines the user ID for the web server process. If it is not set, the default user ID from the host system is used. These variables are optional and can remain unset, allowing the system to use default values.
  • Ports: Maps the application's internal port to an external port on the host system.
  • Environment: Contains environment-specific settings like XDEBUG and IGNITION.
  • Volumes: Mounts the application code into the container's file system.

mariadb

This server provides the MariaDB database system, a popular and robust open-source SQL database management system, essential for storing and managing data in your Laravel application.

Configuration

  • MYSQL_ROOT_PASSWORD, MYSQL_DATABASE, etc.: These variables control the database access, defining the root password, user credentials, and even allowing for an empty password. This flexibility provides different levels of security based on your environment needs. Out of the box, Laravel uses environment variables with the DB_ prefix.
  • Ports: Allows communication with the database from the host system.
  • Volumes: Ensures data persistence across container restarts.
  • Healthcheck: Provides a mechanism to check if the database is running properly.

smtp

The SMTP server, implemented here using Mailhog, allows for the sending of test email messages. This aids in developing and testing email functionalities within the Laravel application without the risk of accidentally sending test messages outside the local environment to real people.

Configuration

  • Ports: Exposes SMTP server and web UI for interaction and inspection.

mockApiServer

The Mock API server allows for mimicking interactions with third-party applications, without the need to interact with real production servers. It helps in testing and developing features that rely on external APIs.

Configuration

  • Ports: Maps the internal port to allow interactions from the host system.
  • Environment: Sets up specific properties like time zones and paths to configurations. For example, mockserver-initializer.json is where you configure mock responses that would normally go to third-party production REST APIs.

COMPOSE_PROJECT_NAME

The variable 'COMPOSE_PROJECT_NAME' is used to customize the naming of Docker containers, networks, and volumes, providing a way to make the Docker compose file more portable and reusable. It affects the prefixes and network name, helping to avoid conflicts and facilitate organization.

The .env File

Located in the same folder as the docker-compose file, the .env file is a powerful way to manage environment-specific settings.


COMPOSE_PROJECT_NAME=my_project

DB_CONNECTION=mysql
DB_HOST=mariadb
DB_PORT=3306
DB_DATABASE=laravel
DB_USERNAME=sail
DB_PASSWORD=password
...

Conclusion

This generic Docker compose file for Laravel 10 projects not only provides a seamless local development environment but also makes it easily adaptable across various projects. By encapsulating complex setups like SSL, test databases, Mock API servers, and email handling, it offers a robust platform that can be tailored to specific needs without unnecessary complexity. Future articles may delve into each server's functionality, providing readers with even more insights into this powerful configuration.

Please let me know in the comments section to tell me about your experiences with using Laravel in Docker. What kinds of challenges have you faced? What problems and solutions have you found? Are there other Docker containers that might be useful for other developers to consider (like Redis)? Would you like additional articles focused on individual servers?

Saturday, August 12, 2023

Setting Defaults in Laravel Eloquent Models: 5 Powerful Techniques

Introduction

When working with Laravel Eloquent Models, setting default values for various attributes can be an essential requirement. In this post, we'll explore five different ways to set default values in a Laravel 10 Eloquent Model, each with unique characteristics and use cases.

  1. Use of the $attributes Array
    The simplest and most straightforward way to set default values for your Eloquent model's attributes. Only accepts scalar defaults and applies only to the initial object.
  2. Using Accessors
    Allows considering other attributes of the Model and applies dynamically throughout the lifecycle of the Model. It enables manipulation of attribute values dynamically.
  3. Using Database Defaults
    Best for attributes that have little to do with data retrieved by the application, like timestamps and IDs. It may also be used as a last resort in some cases.
  4. Use of Protected static function boot()
    Allows using a method or service to set a default value at initialization. Useful when scalar defaults are not sufficient.
  5. Using CastsAttributes
    Casting allows converting attribute values and setting defaults through custom casting. Requires that the attribute already be set when retrieving and may require setting an initial value (typically null) in the $attributes array.

Example: Product Model

Let's create a Product model that utilizes all the mentioned techniques on different fields:


use Illuminate\Database\Eloquent\CastsAttributes;

class Product extends Model
{
    protected $attributes = [
        'status' => 'active',
        'metadata' => null, // Initial value for custom cast
    ];

    protected $casts = [
        'metadata' => MetadataCast::class, // Custom cast for metadata
    ];

    protected static function boot()
    {
        parent::boot();

        static::creating(function ($model) {
            $model->slug = Str::slug($model->name);
        });
    }

    public function getPriceAttribute($value)
    {
        // Apply a discount or format the price based on other attributes
        return $value * 0.9; // Example: 10% discount
    }

    public function getStatusAttribute($value)
    {
        return $value ?: 'active';
    }
}

class MetadataCast implements CastsAttributes
{
    public function get($model, $key, $value, $attributes)
    {
        return json_decode($value) ?: ['default_key' => 'default_value'];
    }

    public function set($model, $key, $value, $attributes)
    {
        return json_encode($value);
    }
}

// Migration example for database defaults
Schema::create('products', function (Blueprint $table) {
    $table->id();
    $table->string('name');
    $table->string('slug');
    $table->decimal('price');
    $table->string('status')->default('active');
    $table->timestamps(); // created_at will be set by default
});

In this example, different attributes of a product are handled using different techniques, demonstrating the flexibility and power of Laravel's Eloquent.

Conclusion

Setting default values in Laravel Eloquent Models can be achieved in various ways, each with its own strengths and use cases. From the simplest $attributes array to more complex boot methods and custom casting, Laravel provides a rich set of tools for managing default values. The provided example illustrates how these can be combined in a cohesive manner to create a robust and flexible model.

I hope this has been helpful in understanding the different techniques available. If you have any questions or need further clarification on any of the methods discussed, please feel free to leave a comment below. Additionally, if you have discovered or utilized other ways to set default values in Laravel that were not covered in this post, we encourage you to share them with the community. Your insights and contributions can help others in their development journey.

Monday, August 07, 2023

Dynamically Resizing Cross-Domain IFrames

In the age of embedded content and third-party integrations, iframes have become an essential tool for web developers. They allow us to embed content from one site into another seamlessly. However, one common challenge is resizing the iframe to fit its content, especially when dealing with cross-domain iframes, and framed content that should change the size of the page over time.

Note that to use this technique, both the parent and the third-party child web site must have code to communicate with each other. All modern browsers enforce this.

Step 1: Embed the Iframe

<iframe id="myIframe" src="https://example.com/iframe-content" width="420" height="1024" style="width:100%;border:0;overflow:hidden;" scrolling="no" allowfullscreen="allowfullscreen"></iframe>

Note that the scroll bar is hidden in this iframe to prevent it flashing when the internal content changes size.

Step 2: Set Up the Parent Window

<script>
    window.addEventListener('message', function(event) {
        if (event.origin !== 'https://example.com') return;
        var iframe = document.getElementById('myIframe');
        iframe.style.height = event.data.height + 'px';
    }, false);
</script>

Step 3: Implement the Iframe Content

<script>
    window.addEventListener("DOMContentLoaded", function () {
        setInterval(function () {
            var height = document.body.scrollHeight;
            window.parent.postMessage({height: height}, document.referrer);
        }, 250);
    });
</script>

Note that this script posts an update every 1/4 second to handle dynamic page size changes in a responsive manner at a reasonable rate.

Conclusion

Dynamically resizing cross-domain iframes is a common challenge that can be effectively addressed using the postMessage method. By combining this method with some simple JavaScript code, we can create a responsive and user-friendly experience, allowing the iframe to adjust its height based on its content.

This approach ensures a seamless integration of third-party content and enhances the overall usability of the website. It demonstrates the flexibility and power of modern web development techniques, providing a robust solution for one of the more nuanced challenges in front-end development.

Thursday, August 03, 2023

Dynamically Registering Service Classes in Laravel 10

Introduction

In the process of migrating a proprietary PHP application to the Laravel 10 framework, I faced an interesting challenge. The application I was working on had 44 service classes. In Laravel, service classes are typically registered manually in the AppServiceProvider.php file. However, the thought of manually registering all these services seemed daunting and inefficient. Plus, it would be a hassle to update the AppServiceProvider.php every time a service is added, renamed, or removed. Therefore, I decided to find a way to register these service classes dynamically. This post outlines the solution I came up with.

Problem Statement

When migrating a large PHP application into Laravel, manually registering a large number of service classes is not only tedious but also prone to errors. Moreover, it's not scalable: every time we add, rename, or remove a service, we need to manually update the AppServiceProvider.php file. We need a solution that allows us to dynamically register all service classes in the application and automatically adjust when changes are made.

Solution

The solution I came up with involves using Laravel's File::allFiles() method to get all PHP files in the service classes directory and then dynamically register these classes in the AppServiceProvider.php file. The service classes are registered using Laravel's service container, which allows Laravel to automatically resolve these classes when they're needed in other parts of the application.

Here is a code snippet used to find all the classes in any package. I happen to have it in a class called ClassUtil:


/**
 * This method is used to recursively retrieve all the classes within a package that have been configured in the Composer autoloader.
 *
 * @param string $package The package name
 *
 * @return string[] The classes
 */
public function getPackageClasses(string $package): array
{
    /* Get all PHP files in the package directory */
    try {
        $basePath = base_path($package);
        $files = File::allFiles($basePath);
    } catch (Exception) {
        /* Catches the case where the default Laravel "App" package resides in the "app" folder and the server is case-sensitive. */
        $basePath = base_path(lcfirst($package));
        $files = File::allFiles($basePath);
    }
    error_log($basePath);

    $rootPath = str_replace(str_replace('/', DIRECTORY_SEPARATOR, $package), '', $basePath);

    $classes = [];
    foreach ($files as $file) {
        /* Convert the file path to a namespaced class name */
        $class = str_replace(
            ['/', '.php'],
            ['\\', ''],
            Str::after($file->getRealPath(), $rootPath)
        );

        /* Check if the class exists and is not abstract */
        if (class_exists($class) && !(new ReflectionClass($class))->isAbstract()) {
            $classes[] = $class;
        }
    }

    return $classes;
}

And this is how I use it in AppServiceProvider.php:


/**
 * Register any application services.
 *
 * @return void
 */
public function register(): void
{
    parent::register();
    foreach ((new ClassUtil())->getPackageClasses('App/Services') as $class) {
        $this->app->singleton($class, function () use ($class) {
            return new $class();
        });
    }
}

Benefits

This technique has several benefits:

  • Simplicity: It saves us the trouble of manually registering each service class.
  • Scalability: It allows us to easily add, rename, or remove services without having to manually update the AppServiceProvider.php file.
  • Flexibility: It provides a flexible way of managing service classes, especially in large applications.

Conclusion

Dynamically registering service classes in Laravel is a handy trick that can save you a lot of time and effort, especially when dealing with large applications. I hope this post helps you in your Laravel development journey. If you have any questions or comments, feel free to leave them below!

Thursday, June 15, 2023

Creating and Nesting SimpleXMLElement Objects in PHP

Introduction

When working with XML data in PHP, the SimpleXMLElement class provides a convenient way to create and manipulate XML structures. One common requirement is to create a SimpleXMLElement and add it as a child to another SimpleXMLElement. In this blog post, we'll explore the correct solution to achieve this.

Creating the Parent and Child Elements

/* Create the parent SimpleXMLElement */
$parent = new SimpleXMLElement('<parent></parent>');

/* Create the child SimpleXMLElement */
$child = new SimpleXMLElement('<child></child>');

Adding Content to the Child Element

$child->addChild('name', 'John');
$child->addChild('age', 25);

Importing and Nesting the Child Element

Now comes the crucial part: importing and nesting the child element within the parent element. We'll use the dom_import_simplexml() function to convert the SimpleXMLElement objects to DOMNode objects. Here's how it's done:

$domChild = dom_import_simplexml($child);
$domParent = dom_import_simplexml($parent);
$domChild = $domParent->ownerDocument->importNode($domChild, true);
$domParent->appendChild($domChild);

In the above code, we import the child element into the parent element's document using the importNode() method. The second argument true indicates that we want to import the entire subtree of the child node.

Printing the Final XML Structure

To see the final XML structure, we can call the asXML() method on the parent element:

echo $parent->asXML();

This will output the complete XML structure, including the parent and nested child elements.

The xmlAdopt() Method

To simplify the process of adopting a child element into a parent element, we can use a helper method called xmlAdopt():

/**
 * Adopt a SimpleXMLElement into another SimpleXMLElement.
 *
 * @param SimpleXMLElement $parent the parent element
 * @param SimpleXMLElement $child  the child element to add to the parent
 */
private function xmlAdopt(SimpleXMLElement $parent, SimpleXMLElement $child): void
{
    $domChild = dom_import_simplexml($child);
    $domParent = dom_import_simplexml($parent);
    $domChild = $domParent->ownerDocument->importNode($domChild, true);
    $domParent->appendChild($domChild);
}

Using the xmlAdopt() Method:

$this->xmlAdopt($parent, $child);

Conclusion:

Creating and nesting SimpleXMLElement objects in PHP requires careful handling

Monday, May 14, 2018

MySQL AES Encryption in Ruby

I was asked to find a way to encrypt strings in Ruby that would be compatible with MySQL's AES_ENCRYPT and AES_DECRYPT functions. I found several solutions online, but none of them worked the way I expected. After cobbling together several examples, I finally came up with a solution that proved to be compatible with the MySQL version. This was written for use with Ruby 2.3.5. This module can be used as follows:

Tuesday, May 01, 2018

Running a Tomcat-based Spring Boot application in Docker

In one of the projects I am working on, I was tasked from taking a Tomcat application that ran on an EC2 server, and get it running with the Spring Boot framework in a Docker container. The twist is that the application needed read-write access to the resources folder within the project. In order to do that, the application needed to be run as an "exploded" WAR file (It had been run that way on the old server as well).

I accomplished this with this Docker file:

The WAR file is compiled with the "spring-boot-maven-plugin", and includes all the dependency JARs, so the application can be run stand-alone.

That entry in the POM is:

And the "org.springframework.boot.loader.WarLauncher" Class is what Spring Boot uses to bootstrap the applicatiton on the embedded Tomcat.

Thursday, November 02, 2017

OpenPojo Java 9 Compatibility Workaround

I am working on updating applications at work to Java 9. I have been using OpenPojo for years to test all my POJOs in one go. However, I found that the tests started throwing the exception:

java.lang.NoClassDefFoundError: Could not initialize class com.openpojo.reflection.java.packageloader.Package

I traced through the OpenPojo code and found that it was hard coded to read the Java class path from the old "sun.boot.class.path" system property. This property has been completely removed from Java 9, in favor of "java.class.path," which has been available since at least Java 7. (See https://docs.oracle.com/javase/8/docs/technotes/tools/windows/findingclasses.html)

I submitted my findings in an issue for the developers consideration: https://github.com/oshoukry/openpojo/issues/108

In the meantime, I developed the following workaround that can be inserted into a current POJO test class, and will allow the code to function the same way in Java 9.

Monday, August 07, 2017

Find All the Divisors for a Number

In some of my load testing, I want to run a certain number of transactions. My script takes parameters for a number of threads and the number of loops all the threads should go to. When I have a certain target number I want to get to, and an idea of what number of threads I want, I would like to figure out exactly how many loops I need to run for an exact number of threads.

For example, lets say I want to process 16,000,000 transactions with about 300 threads. I can run the following Java class, and figure out that if I use 320 threads, I need 50,000 loops.


Enter an integer: 16000000
Even divisors for 16000000
8000000 x 2 = 16000000
4000000 x 4 = 16000000
3200000 x 5 = 16000000
2000000 x 8 = 16000000
1600000 x 10 = 16000000
1000000 x 16 = 16000000
800000 x 20 = 16000000
640000 x 25 = 16000000
500000 x 32 = 16000000
400000 x 40 = 16000000
320000 x 50 = 16000000
250000 x 64 = 16000000
200000 x 80 = 16000000
160000 x 100 = 16000000
128000 x 125 = 16000000
125000 x 128 = 16000000
100000 x 160 = 16000000
80000 x 200 = 16000000
64000 x 250 = 16000000
62500 x 256 = 16000000
50000 x 320 = 16000000
40000 x 400 = 16000000
32000 x 500 = 16000000
31250 x 512 = 16000000
25600 x 625 = 16000000
25000 x 640 = 16000000
20000 x 800 = 16000000
16000 x 1000 = 16000000
15625 x 1024 = 16000000
12800 x 1250 = 16000000
12500 x 1280 = 16000000
10000 x 1600 = 16000000
8000 x 2000 = 16000000
6400 x 2500 = 16000000
6250 x 2560 = 16000000
5120 x 3125 = 16000000
5000 x 3200 = 16000000
4000 x 4000 = 16000000
3200 x 5000 = 16000000
3125 x 5120 = 16000000
2560 x 6250 = 16000000
2500 x 6400 = 16000000
2000 x 8000 = 16000000
1600 x 10000 = 16000000
1280 x 12500 = 16000000
1250 x 12800 = 16000000
1024 x 15625 = 16000000
1000 x 16000 = 16000000
800 x 20000 = 16000000
640 x 25000 = 16000000
625 x 25600 = 16000000
512 x 31250 = 16000000
500 x 32000 = 16000000
400 x 40000 = 16000000
320 x 50000 = 16000000
256 x 62500 = 16000000
250 x 64000 = 16000000
200 x 80000 = 16000000
160 x 100000 = 16000000
128 x 125000 = 16000000
125 x 128000 = 16000000
100 x 160000 = 16000000
80 x 200000 = 16000000
64 x 250000 = 16000000
50 x 320000 = 16000000
40 x 400000 = 16000000
32 x 500000 = 16000000
25 x 640000 = 16000000
20 x 800000 = 16000000
16 x 1000000 = 16000000
10 x 1600000 = 16000000
8 x 2000000 = 16000000
5 x 3200000 = 16000000
4 x 4000000 = 16000000
2 x 8000000 = 16000000
1 x 16000000 = 16000000
=== End ===

Essentially, this provides all the numbers that evenly divide the provided number. Or, in other words, find multipliers that will result in a desired product.

Thursday, May 25, 2017

Cleaning Up the IntelliJ IDEA Clone Repository Dialogue Box

Over the course of the last couple of years, I have checked out dozens of projects with IntelliJ IDEA from various Git repositories. Many of these projects were one-time checkouts, and a slew of them are no longer valid because of domain name changes.


There is no internal mechanism to remove URLs from this dialogue box, and I had not found anything on the Internet on how to do this. I was certain that this information had to be in a configuration file somewhere.

I ran across this page: Directories used by the IDE, which headed me in the correct direction. I eventually found the file I was looking for (using Mac OS X):


~/Library/Preferences/<PRODUCT><VERSION>/options/vcs.xml

This file has a set of <UrlAndUserName> elements that can be individually deleted, as needed:


<application>
  <component name="GitRememberedInputs">
    <option name="visitedUrls">
      <list>

        …
        <UrlAndUserName>
          <option name="url" value="https://github.com/appium/sample-code.git" />
          <option name="userName" value="" />
        </UrlAndUserName>

        …
      </list>
    </option>
    <option name="cloneParentDir" value="$USER_HOME$/IdeaProjects" />
  </component>

</application>
 
Exit IntelliJ IDEA completely, and start it up again. The next time you use the Clone Repository dialogue box (e.g., using "Check out from Version Control" in the Welcome dialogue box), you will see the list reduced to whatever entries you left in the vcs.xml file.

This solution was tested in version 2017.1, and I confirmed the same file location for version 2016.1.

Wednesday, May 24, 2017

Kubernetes Readiness and Liveness with Apache Kafka REST Proxy

When setting up Readiness and Liveness checks in Kubernetes for Kafka connectors, the use of the httpGet described in my previous blog post (Kubernetes Readiness and Liveness with Spring Boot Actuator) is not an option because there is no endpoint to reference. These can be deployed with the Apache Kafka REST Proxy, which gets us on the right path, but doesn't quite work how we want in this respect.

The Kafka REST Proxy provides endpoints that allow one to get some basic status info about connectors. However, the standard Kubernetes httpGet calls use status code >= 200 and < 400 to determine the status, and since the Kafka REST status endpoint always provides a 200 status code, it is not possible to use this methodology to determine if a connector is down.

What we would like to do is check the content of the status call, and do a string comparison. For example, when the service is up, the status endpoint indicates that the state is "RUNNING":
# curl http://10.30.128.1:8083/connectors/mysql-kafka-connector/status
{"name":"mysql-kafka-connector","connector":{"state":"RUNNING","worker_id":"10.30.128.1:8083"},"tasks":[{"state":"RUNNING","id":0,"worker_id":"10.30.128.1:8083"}]}

We can pause the connector using this endpoint:
# curl -i -X PUT http://10.30.128.1:8083/connectors/mysql-kafka-connector/pause
HTTP/1.1 202 Accepted

And then the state is changed to PAUSED:
# curl http://10.30.128.1:8083/connectors/mysql-kafka-connector/status
{"name":"mysql-kafka-connector","connector":{"state":"PAUSED","worker_id":"10.30.128.1:8083"},"tasks":[{"state":"PAUSED","id":0,"worker_id":"10.30.128.1:8083"}]}

To accomplish this check, we can leverage the exec command probe:
readinessProbe: 
  exec: 
    command:
      - /bin/sh 
      - -c 
      - curl -s http://127.0.0.1:8083/connectors/mysql-kafka-connector/status | grep "RUNNING"
  initialDelaySeconds: 240
  periodSeconds: 5
  timeoutSeconds: 5 
  successThreshold: 1
  failureThreshold: 10 
livenessProbe:
  exec: 
    command: 
      - /bin/sh
      - -c 
      - curl -s http://127.0.0.1:8083/connectors/mysql-kafka-connector/status | grep "RUNNING"
  initialDelaySeconds: 300 
  periodSeconds: 60
  timeoutSeconds: 10 
  successThreshold: 1
  failureThreshold: 3

The the exec command allows us to execute a shell command. In this case:
  • running the shell (/bin/sh)
  • telling it to run a single command (-c)
  • with the command being a cURL call to the specific connector status endpoint, and grepping for the string "RUNNING"
When the grep is successful, Kubernetes interprets this as a success. If the grep comes back empty (i.e., "RUNNING" is not found), then it gets viewed as a failure. You can then test this on the server by pausing the service in question as described above.

To get the service running again and start passing readiness and liveness again, then you will want to use the RESUME endpoint.
# curl -i -X PUT http://10.30.128.1:8083/connectors/mysql-kafka-connector/pause
HTTP/1.1 202 Accepted


Tuesday, May 23, 2017

Kubernetes Readiness and Liveness with Spring Boot Actuator

In Kubernetes, "readiness" is the indicator that the service is ready to accept traffic, and is only performed at the beginning of a pod's life cycle. "Liveness" is a periodic health check that should indicate that the service is still functional within the pod.
More details can be found in the documentation at
https://kubernetes.io/docs/tasks/configure-pod-container/configure-liveness-readiness-probes/

Spring Boot is a stand-alone Spring environment well suited for micro services.
https://projects.spring.io/spring-boot/

Spring Boot has a bundle available called "Actuator" that exposes several helpful endpoints, one of which is a "health" endpoint. The simple version of this endpoint returns a simple JSON with a status UP or DOWN.
https://github.com/spring-projects/spring-boot/tree/master/spring-boot-actuator

One particular feature of the health endpoint that is useful is that besides the text indicator in the JSON response, it also signals up and down through the status code. UP = 200, and DOWN = 503 (Service Unavailable).

Putting this all together, the readiness and liveness configuration in the Kubernetes deployment YAML can look something like this:

readinessProbe:
httpGet:
  scheme: HTTP
  path: /health
  port: 8080
initialDelaySeconds: 240
periodSeconds: 5
timeoutSeconds: 5
successThreshold: 1
failureThreshold: 10
livenessProbe:
httpGet:
  scheme: HTTP
  path: /health
  port: 8080
initialDelaySeconds: 300
periodSeconds: 60
timeoutSeconds: 10
successThreshold: 1
failureThreshold: 3

In this example, we instruct Kubernetes to wait 240 seconds to allow the application to start before performing the check. It will retry up to 10 times with a five second pause between each try. It will wait for a maximum of 5 seconds for a result to be returned. After 10 failures, the pod will be restarted.

For the liveness check, we instruct Kubernetes to wait 300 seconds, and to check every 60 seconds. If three failures occur in a row, the pod will be restarted.

Wednesday, May 03, 2017

A toString Comparator for arbitrary objects

I recently ran into a problem where I wanted to add objects attained by reflection to a TreeSet. In this specific case, I had a problem when a Locale object was retrieved. It could not be added to the TreeSet because it is not "Comparable." It did, however, have toString values that could be sorted intelligibly.

I decided to create a Comparator that would handle arbitrary objects, and allow them to be added to a TreeSet of type Object:

The caveat is that this works best when the object in question overrides the default toString method in a meaningful way. If the base Object.toString() method is inherited by the object, then the sorting will most likely appear random, since the method looks like this:

    public String toString() {
        return getClass().getName() + "@" + Integer.toHexString(hashCode());
    }

Wednesday, August 17, 2016

Fix for "HibernateJpaDialect - JDBC Connection to reset not identical to originally prepared Connection" warning

After updating an application to Hibernate 5.1.1 from 5.1.0, I started seeing the following warning:

HibernateJpaDialect - JDBC Connection to reset not identical to originally prepared Connection

I did not find an "explicit" solution on the Internet, but looking through some of the code fixes in the ngrinder project, I figured out that I could fix my problem the same way by adding <prop key="hibernate.connection.release_mode">on_close</prop> to applicationContext.xml:

Thanks for this solution, JunHo!

Friday, August 12, 2016

JMeter in IntelliJ IDEA on Mac OS X

Quick Answer

Manually add the JMeter path at

Preferences » Other Settings » JMeter » JMeter home directory

Long Answer

I wanted to be able to launch JMeter scripts from within IntelliJ IDEA. This is the process I went through to make this happen:

Install JMeter

Having already installed Homebrew, JMeter can be easily installed with the command

brew install jmeter

Install JMeter Plugin in IntelliJ IDEA

Preferences » PlugIns » Search for JMeter » Select JMeter plugin » install » restart IntelliJ

Configure JMETER_HOME

This is where the troubleshooting needed to start. For the quick solution, see the first section. Otherwise, this is the process I went through:

Ideally, one would want things to "just work" after installing JMeter and the plugin. Unfortunately, when I created my first JMeter Run Configuration in IntelliJ, I got the message in the dialog box:

Run Configuration Error: JMeter not found

I eventually found a dialogue box under

Preferences » Other Settings » JMeter

with a helpful indicator that

JMETER_HOME is used by default

Sure enough, when I ran the env command in a Terminal, JMETER_HOME was not there.

To find out what my JMeter home directory was, I did the following in the Terminal

$ which jmeter
/usr/local/bin/jmeter
$ cat /usr/local/bin/jmeter
#!/bin/bash
exec "/usr/local/Cellar/jmeter/3.0/libexec/bin/jmeter" "$@"

So, based on some other information I gathered, the home directory was just above the "bin" directory.

My first attempt was to add the following line to my .bash_profile:

export JMETER_HOME=/usr/local/Cellar/jmeter/3.0/libexec

Sadly, I found this didn't work after rebooting and confirming that it showed up when the env command was executed in the Terminal.

I eventually ran across Setting global environment variables in IntelliJ IDEA and other test config goodies, from which I learned that environment variables are not automatically passed to GUI applications in Mac OS X. Nonetheless, Update 2 in the article looked promising.

I then added this line to .bash_profile:

launchctl setenv JMETER_HOME /usr/local/Cellar/jmeter/3.0/libexec

Again, to my frustration, I found that after rebooting and confirming that launchctl getenv JMETER_HOME displayed the correct value in the terminal, that this only worked in IntelliJ when I started IntelliJ, quit completely, and then started it again. I have no idea why the environment variable only seems to get read on the second startup.

So, for my final answer, I just had to go with the manual solution of adding the JMeter home path as an Override in the dialogue box found at:

Preferences » Other Settings » JMeter » JMeter home directory


Friday, August 05, 2016

Extract the icon from an APK file

Using the apk-parser library (https://github.com/caoqianli/apk-parser), I developed the following code that will extract the icon from an APK file. Note that there is no guarantee about what size the icon will be. Enjoy!

Renaming a dependency JAR before buiding a WAR in Maven

I was recently tasked with updating New Relic on our servers. When this was initially set up, the server was set up with a JVM command line option:
-javaagent:/usr/share/tomcat7/webapps/ROOT/WEB-INF/lib/newrelic-3.9.0.jar
When working on updating the version, I wanted to change this so that
  1. We could update the New Relic Agent whenever a new update is available
  2. We would not need to change the JVM command line each time the Agent was updated
To accomplish this, I wanted the New Relic Agent JAR name to always be the same, regardless of the version. I found maven-dependency-plugin through a web search, but ran across a problem where my WAR file was being created before the JAR was downloaded and renamed (using maven-war-plugin). All the examples I ran across used <phase>package</phase>, and while that looked right, I figured that this was still happening in the wrong life cycle phase for what I wanted to do. I resorted to reading the documentation, and with some experimenting found that <phase>prepare-package</phase> did this at the right part of the life cycle.
Here is the plugins section of the working pom.xml:
You do not need to include this dependency in your dependencies section, unless you are actually using it in your code.
We changed the server's JVM command line option to:
-javaagent:/usr/share/tomcat7/webapps/ROOT/WEB-INF/lib/newrelic.jar
And everything worked just great ... once I got the YAML file figured out 😉.

Bonus Notes

  • If you have not worked with YAML before, you will find out quickly that indentation is important to keep the hierarchy of properties right
  • The newrelic.yml file included as an example in the newrelic-java.zip file appears to have an error in it. Specifically, the classloader_excludes property values need to be a commented list on the same line. I got parse errors using the example as-is (i.e., the list is indented with each item on a separate line, and has an extra comma at the end).
  • If you are reading this and setting up a new configuration based on this article, you will also need the newrelic.yml file to end up in the same folder. To that end, place the file in /src/main/webapp/WEB-INF/lib in your Maven-based folder structure.

Wednesday, July 27, 2016

IntelliJ Idea: Can't find gems in Cucumber configurations when using RVM Ruby

I had updated Ruby on my Mac OS X laptop using RVM:

curl -sSL https://get.rvm.io | bash -s stable --ruby
rvm use 2.3 --default

In IntelliJ IDEA Ultimate 2016, I changed my Cucumber configuration to use the "RVM: ruby-2.3.0" SDK.

I then got any number of errors regarding not having gems installed like cucumber, any of the required gems, and then finally the debug gems (ruby-debug-ide and debase).
Run Configuration Error: Cucumber Gem isn't installed for RVM

Initially, I had some success getting rid of errors one by one by manually running "gem install" on the command line for every gem that was missing. However, in the end, I still had the problems with the debug gems not being installed, and getting errors when attempting to have IntelliJ install the debug gems itself.

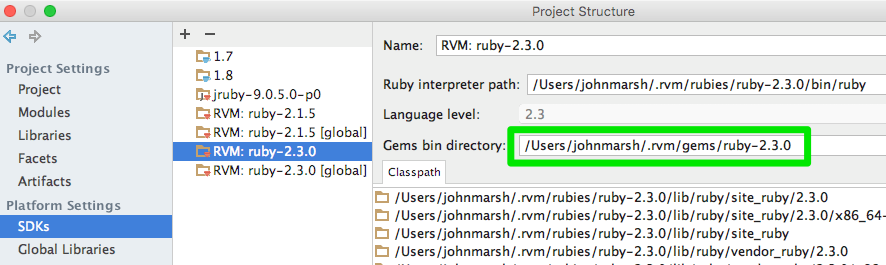
I finally figured out that the Gems bin directory was incorrect. When I when to

File ➜ ProjectStructure ➜ SDKs ➜ RVM: ruby-2.3.0

and changed Gems bin directory to
/Users/[username]/.rvm/gems/ruby-2.3.0

Then things started working just fine.


Friday, December 11, 2015

Finagle Filter path with "andThen"

In way of passing on what I am continuing to learn about chained Finagle Filters in Scala:

Filters can be chained together with the “andThen” function. This is essentially an indicator of which direction the Request (input) is handed off to the next filter. I believe that when we normally think about filters, we expect the filter to act on the Request (like a sieve, for example), and indeed it can. However, once the Request gets to the end of the Filter chain, it gets turned into a Response (output), which also, in turn, can be filtered as it is passed back back to the beginning of the Filter chain.

Here is a ScalaTest that shows how both the inward and outward paths can be used to modify the request and the response, as well as a short-circuit in Filter3 that prevents Filter4 from being run (you can change the condition to true to see the path through all four filters). The example Finagle Service here simply takes an initial value and concatenates the request to make a Response:

import com.twitter.finagle.{Service, SimpleFilter}
import com.twitter.util.Future
import org.scalatest._

class StringService(response: String) extends Service[String, String] {
  override def apply(request: String): Future[String] = Future.value(response + ":" + request)
}

object StringFilter1 extends SimpleFilter[String, String] {
  override def apply(request: String, service: Service[String, String]): Future[String] = {
    val requestUpdate = request.concat(" » enter-1")
    service(requestUpdate).map(futureString => futureString.concat(" » exit-1"))
  }
}

object StringFilter2 extends SimpleFilter[String, String] {
  override def apply(request: String, service: Service[String, String]): Future[String] = {
    val requestUpdate = request.concat(" » enter-2")
    service(requestUpdate).map(futureString => futureString.concat(" » exit-2"))
  }
}

object StringFilter3 extends SimpleFilter[String, String] {
  override def apply(request: String, service: Service[String, String]): Future[String] = {
    val requestUpdate = request.concat(" » enter-3")
    val myCondition = false
    if(myCondition){
      service(requestUpdate).map(futureString => futureString.concat(" » exit-3"))
    } else {
      Future(requestUpdate.concat(" » short-circuit-3"))
    }
  }
}

object StringFilter4 extends SimpleFilter[String, String] {
  override def apply(request: String, service: Service[String, String]): Future[String] = {
    val requestUpdate = request.concat(" » enter-4")
    service(requestUpdate).map(futureString => futureString.concat(" » exit-4"))
  }
}

class FilterStackTest  extends FlatSpec with Matchers {
  "A Filter" should "Operate like a Stack" in {
    var testService =  new  StringService("Service A")
    var testFilter = StringFilter1 andThen StringFilter2 andThen StringFilter3 andThen StringFilter4

    System.out.println(testFilter("start",testService))
  }
}

The console output is:
Promise@71098046(state=Done(Return(start » enter-1 » enter-2 » enter-3 » short-circuit-3 » exit-2 » exit-1)))

And when val myCondition = true :

Promise@380962452(state=Done(Return(Service A:start » enter-1 » enter-2 » enter-3 » enter-4 » exit-4 » exit-3 » exit-2 » exit-1)))